
Using a camera as a game controller


There are two different worlds on the web. The first one is the world of browser games, which are usually built with HTML and JavaScript. They are somewhat popular and very accessible because you don’t need to download and install anything, and requirements for hardware are usually low.
The second world is a world of machine learning and computer vision. A great leap was made in that area over last years. As for my knowledge, those two didn’t intersect so far but in this post, I will start changing that. I will describe how to make a browser game that uses a camera input as a controller.
TLDR

Full source code from this blogpost is published here. There are 5 branches with "step-" prefix, each branch matches one section of this article to make it easier to follow.
Plan:
- Create a basic browser game with the PixiJS engine
- Add the Mediapipe library to the project
- Integrate camera input with the application
- Add some more interesting logic to make it look more like a game
- Deploy the game to Github pages
- Extra. Hint about gesture recognition
Creating the PixiJS game template
The official tutorials propose to bootstrap the project as a single index.html file and import the game engine as a pixi.js.min file. While that would work for simpler cases, we want to have a proper Webpack build to avoid some headaches in the future. We will take a great repo from @proudcat Github user as a base.
This boilerplate has a:
- package.json to manage our dependencies
- build script that merges all JS sources into a single minified bundle
- development build script with hot reload
- production build script that transpiles all our JS source files
- manages image assets
- good file structure that will let us have a better organized code
This will be our file structure at this point:
.
├── dist
│   ├── index.html
│   ├── game.min.879458fc.js
│   └── assets
│       └── bunny.png
├── src
│   ├── index.html
│   ├── assets
│   │   └── bunny.png
│   └── js
│       └── main.js
├── package.json
├── webpack.common.js
├── webpack.dev.js
└── webpack.prod.js
At this point we should be able to run the project with the following two commands:
npm i
npm run start
Google Chrome will open and we will see the simplest game screen version with a bunny spinning in it:

Right away we will split main.js into two files:
App.js is responsible for application configuration and provides the app object
import * as PIXI from 'pixi.js'

export const app = new PIXI.Application({
   width: 720,
   height: 1280,
   backgroundColor: 0x1099bb,
   view: document.querySelector('#scene'),
   resolution: window.devicePixelRatio || 1
});
Main.js will serve as an entry point for our application.
import {app} from "./app";

app.ticker.add((delta) => {
 // main game loop
});
Mouse control logic
Let’s adjust one of the examples from the PixiJS documentation and get some interaction with the mouse. Here you may find the initial version of an example of how to make a mouse trail, kindly provided by the PixiJS developers. We will adjust it for our needs:
// adds trail sprite to application stage
export function initRope(app) {
   // Create the rope
   let rope = new PIXI.SimpleRope(trailTexture, points);
   // Set the blendmode
   rope.blendmode = PIXI.BLEND_MODES.ADD;
   app.stage.addChild(rope);
}

// executed on every application tick and rerenders the trail
export function mouseTick(app) {
   const mouseposition = app.renderer.plugins.interaction.mouse.global;

   // Update the mouse values to history
   historyX.pop();
   historyX.unshift(mouseposition.x);
   historyY.pop();
   historyY.unshift(mouseposition.y);
   // Update the points to correspond with history.
   for (let i = 0; i < ropeSize; i++) {
       const p = points[i];
// Smooth the curve with cubic interpolation to prevent sharp edges.
       const ix = cubicInterpolation(historyX, i / ropeSize * historySize);
       const iy = cubicInterpolation(historyY, i / ropeSize * historySize);

       p.x = ix;
       p.y = iy;
   }
}Our main.js at this point will look like this:
import {app} from "./app";
import {initRope, mouseTick, rope} from "./trail";

initRope(app);

app.ticker.add((delta) => {
 // main game loop
 mouseTick(app);
});From now on our cursor will leave a nice trail when moving:

Connecting the Mediapipe.js library
Let’s start by adding some dependencies:
npm i @mediapipe/camera_utils@^0.3.1620247984 @mediapipe/control_utils@^0.3.1620247984 @mediapipe/drawing_utils@^0.2.1614797616 @mediapipe/hands@^0.1.1614621970
Next, we need to add some elements to our index.html. We will use them later to capture video input and output the detected hand position.
The final version of the index.html <body> will look like this:
<body>
<div class="container">
 <div class="loading">
   <div class="spinner"></div>
   <div class="message">
     Loading
   </div>
 </div>
 <video class="input_video"></video>
 <canvas class="output_canvas"></canvas>
 <canvas id="scene"></canvas>
</div>
<div class="control-panel"/>
</body>Retrieving and displaying the index finger position
After the layout preparation we are ready to work with “the meat” - actually initialize the library and use it as a controller.
First, let’s write a function that will be executed every time the Mediapipe library recognizes our hand and provides finger coordinates as an output.
Storing and exporting the last coordinates of the index finger:
let position = {x: 0, y: 0};
const FIRST_HAND = 0;
const POINTING_FINGER_TIP = 8;
// stores finger position
const setPosition = (results) => {
   if(results && results.multiHandLandmarks) {
       let finger = results.multiHandLandmarks[FIRST_HAND][POINTING_FINGER_TIP];
       position = {x: finger.x * app.screen.width, y: finger.y * app.screen.height};
   }
}

export const getLastFingerPosition = () => {
   return position;
}
// this callback is executed every time Mediapipe has updates
function onResults(results) {
 setPosition(results);
 if(extraDebug) {
     drawIndexFingerLandMark(results);
 }
}
We use the first hand (which can be both left and right), and we use 8’th point, which according to the Mediapipe documentation is an index fingertip:

The next function is for debugging purposes. It helps to make sure that the library behaves as we expect it to:
function drawindexFingerLandMark(results) {
   // Draw the overlays.
   canvasCtx.save();
   canvasCtx.clearRect(0, 0, canvasElement.width, canvasElement.height);

   if (results.multiHandLandmarks && results.multiHandedness) {
       const isRightHand = true;
       const landmarks = [results.multiHandLandmarks[0][8]];
       drawLandmarks(canvasCtx, landmarks, {
           color: isRightHand ? '#00FF00' : '#FF0000',
           fillColor: isRightHand ? '#FF0000' : '#00FF00',
           radius: (x) => {
               return lerp(x.from.z, -0.4, .01, 1, 0.1);
           }
       });
   }
   canvasCtx.restore();
}Let’s modify our app.js in order to share some common configuration between Mediapipe and PixiJS:
import * as PIXI from 'pixi.js'
export const shouldUseCamera = true;
export const extraDebug = true;

export const APP_WIDTH = 640;
export const APP_HEIGHT = 480;

const app = new PIXI.Application({
   width: APP_WIDTH,
   height: APP_HEIGHT,
   transparent: true,
   view: document.querySelector('#scene')
});
export default app;
Let’s turn the game background transparent – it will reveal a component that displays the camera.
Here we are reusing the application parameters when initializing the camera:
const camera = new Camera(videoElement, {
 onFrame: async () => {
   await hands.send({image: videoElement});
 },
 width: APP_WIDTH,
 height: APP_HEIGHT
});
camera.start(); The camera is not used as a controller yet, but we can take a preview thanks to our debug canvas.
At this point you may encounter an error in the console: Uncaught TypeError: Cannot read property 'getUserMedia' of undefined. Most common reasons are:
- Absence of a camera device
- Google security policy violation that can be fixed by changing the host from '0.0.0.0' to 'localhost' in the webpack configuration.
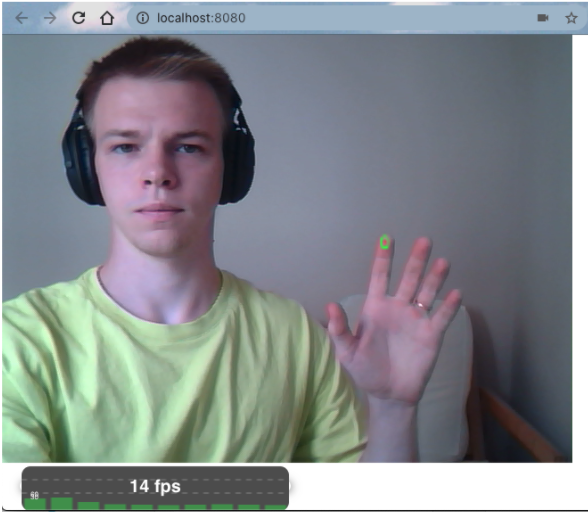
Right now the layers are ordered from top to bottom: debug canvas -> game application -> camera input. If you restart the app and put your hand in front of the camera you may notice a green circle over your index finger. If so - everything as expected. The green circle was drawn by our debug canvas.
If something doesn’t work at this point make sure to synchronize your code with the step-3-mediapipe branch of my demo repository.
Using Mediapipe coordinates as a controller
Now it is time to connect the output of mediapipe and the input of PixiJS. Using the exported function from camera_input.js in trail.js:
function getPosition(app) {
   const mouse = shouldUseCamera ? getLastFingerPosition() : app.renderer.plugins.interaction.mouse.global;
   return {x: mouse.x, y: mouse.y}
}

export function mouseTick(app) {
   const mouseposition = getPosition(app);
…
} And turning on the export const shouldUseCamera = true; parameter in trail.js allows us to get the following result:

It works pretty smoothly, good enough to play games with low requirements. However, the FPS of finger position capture is noticeably lower than the FPS of the game, which could be up to 60.
Check out the step-4-camera-as-input branch to be in sync with the code from the demo.
For better demonstration, I’ve added more game logic in the step-5-game-logic branch. I am skipping it here, as it doesn’t have much to do with the topic of the post.
Deploying to Github pages
For the sake of application demonstration and proving the point of how great webpack is, let’s publish the game on Github pages. This could be done in just a few steps:
- Install gh-pages package:
npm i gh-pages --save2. Add homepage property to the package.json:
"homepage": "http://${username}.github.io/${repoName}",3. Add deploy and predeploy scripts to the scripts section of package.json:
"predeploy": "npm run build",
"deploy": "gh-pages -d dist"
4. Deploy:
npm run deployIn some minutes your application will be available by the homepage link. Otherwise double-check that all steps were executed correctly. The most common mistake is typos in the homepage link.
Feel free to visit and try yourself https://league55.github.io/fruit-ninja-blog-post-demo/.
Advanced controls
The mentioned technique is definitely an interesting way to make your application stand out among others. Obviously, to get the full power of the camera as an input, the user must have the possibility to do clicks and other interactions. There is no ready solution for that yet but you may be interested in my draft. This repository contains my project where I dynamically teach neural networks to recognize two gestures. This might be used as a starting point for making gesture-based browser events.
Summary
In my opinion, browser games have great potential, taking into account how much browser apps are pushing desktop away. Tricks like hand detection may bring some novelty into these applications applications, not to mention that this sort of game is easily convertible into mobile applications and could be run on other platforms, for example, Smart TV.
As a result of this post, we have a basic browser game that uses a camera as a controller and can be a good base for your future projects.